Configure Hour Bank
How to configure the hour bank?
To configure the hour bank:
-
Open the top menu, access Settings and then Zones.
-
Choose the center that needs to configure an hour bank based on its agreement.
-
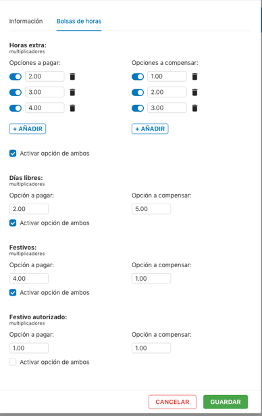
Right-click with the mouse and select edit. You will see a screen like this:
-
In overtime we can add different hour multipliers both to pay and to compensate based on what our agreement or labor pact governs. For free days and holidays we can add a single multiplier, choosing between to pay or compensate. If our agreement contemplates the option to pay and compensate we will click on "activate both option."
How do the data dump to the hour bank?
When we have a published shift and the employee makes a clocking the program will calculate on the due date comparing the shift with the clocking made.
For the calculation to consider if it was a worked free day or holiday we must inform the shift on top of the free day or holiday.
If the employee does not have a published shift and makes a clocking, all that clocking will be computed as hour excess.
How is it managed?
The hour bank to compensate is managed through the predefined templates (see this section).
For the hour bank to pay once the concepts are accepted (expenses, hour excesses, attendance absences) these are reflected in the payroll incident validation section.
Other data such as free days or holidays to pay will automatically dump to payroll incident validation for approval or rejection, the same will happen with night hours (10pm to 6am).
There is also the possibility of adding hours to the bank through a manual regularization (see regularizations section).
For the data to be transferred to payroll incident validation the contract must be published.