Requests
Request List
In the request list, we'll see all employee requests. Here, we can filter by dates, employees, zones, registration date, status, type, internal category, validation, and manager. You can also download a CSV file to view all data in an Excel table.
Two views are available for the request list:
- List view: see the request list as filtered. By default, most recent requests appear first.
- Calendar view: see request distribution throughout the month graphically.
Request Types
- Clocking Incident
- Vacation
- Absences: Absence subtypes are customizable. Create them from Nivimu settings.
- Sick leave. 6 sick leave subtypes available:
- Common illness.
- Work accident.
- Non-work accident.
- Occupational disease.
- Maternity
- Paternity
- Travel
- Payroll advance
- Other Reasons
Some requests are generated automatically when activated in the employee profile (see users module):
- Overtime. Generated automatically when the employee works more hours than configured in their shift.
- Undertime. Generated automatically when the employee works fewer hours than configured in their shift.
- Absence. Generated automatically when the employee doesn't come to work on a day with a scheduled shift.
Vacation
On the requests screen, you can also see available vacation for employees.
-
In green, see the employee's available vacation. The number changes depending on whether it's the employee viewing or one of their managers.
-
In blue, see the employee's contract vacation.
Available until year end: Employee vacation available until year end. In their environment, an employee sees this number in green. Employees see their vacation available until year end because this way, if they want to request it before generating it, they can.
Available generated until today: The number an admin sees in green. The number admins need to see for employee settlements. Available vacation days generated by the employee until today. Calculated by subtracting vacation taken from vacation generated (including regularizations).
Vacation per year: Contract vacation for an employee.
Generated until today: Vacation days the employee has generated until today.
Regularized this year: If we've made any vacation regularization for the employee, we'll see the number of regularized days here.
Balance on January 1st of this year: Vacation the employee carries from the previous year. Can be automatically regularized with an expiration.
Taken this year: Vacation days taken this year.
Scheduled: See scheduled vacation for this employee if any.
Expired from previous year: Vacation carried from the previous year can be regularized via expiration. In zone configuration, you can set the vacation expiration day.
Clicking CSV downloads an Excel with all details about the selected employee's vacation.
My Requests
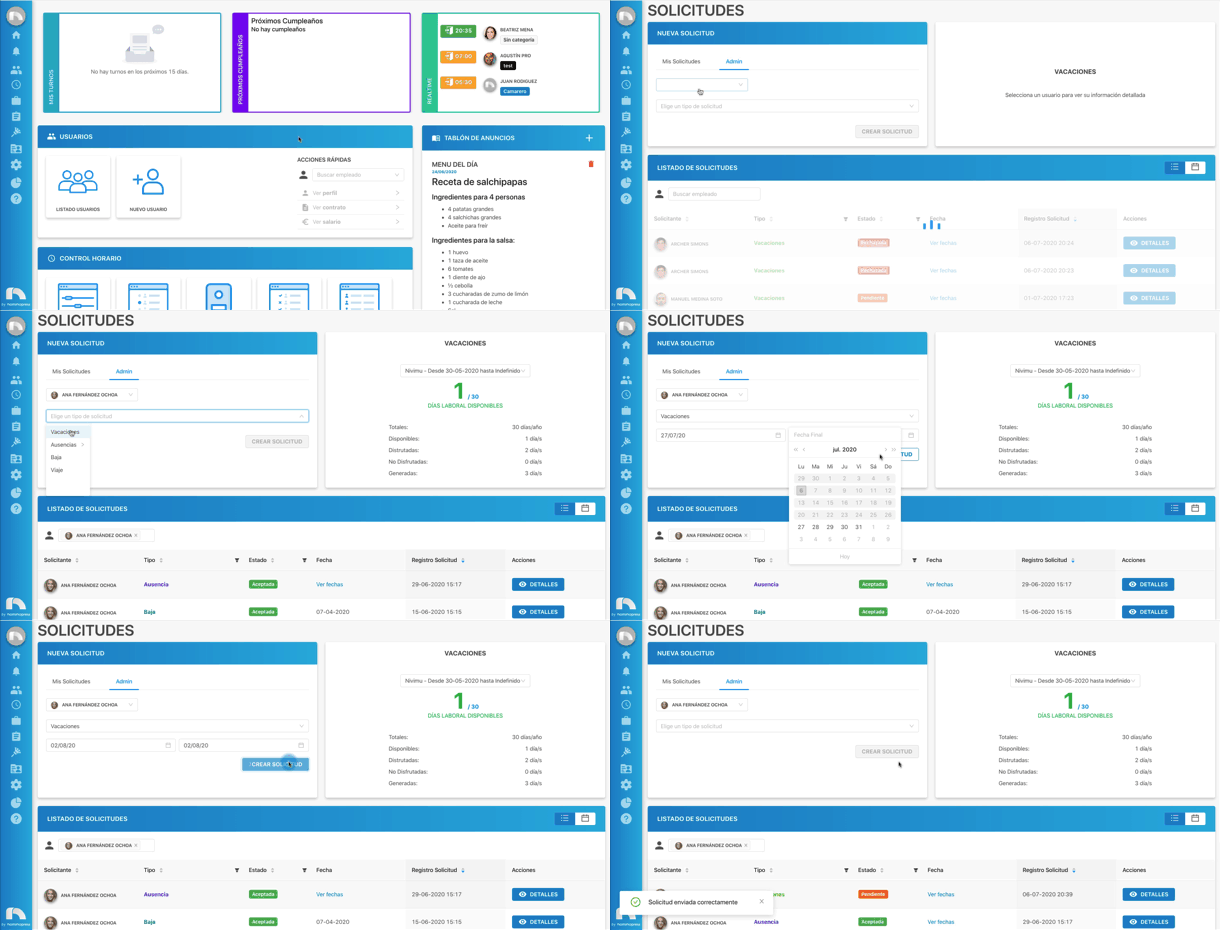
Create a request for yourself:
-
Open the app menu and under Management, click Requests.
-
In the New request section, ensure you're on the My Requests tab.
-
Click the Choose a request type dropdown to select the request you want to send.

-
Once chosen, new sections open based on selected request type. For all types except clocking incident and other reasons, select the day(s) when the request-related event begins.
-
When selecting Absences or Sick leaves, see an Upload File button to attach the absence or leave justification.
-
To choose the date, click the Start date calendar and click the request start day.
-
Then click the End date calendar and select the request end day. If selecting only one day, choose the same day in both selectors.
-
Finally, click Create Request.

Administrator Requests
Center administrators can create requests for employees under their charge. To create a request for one of your employees:
-
Open the app menu and under Management, click Requests.
-
In the New request section, click the Admin tab.
-
Click the Search employee dropdown to select the employee for whom you want to create the request. Search by typing their name or select from all employees.
-
Then click the Choose a request type dropdown to select the request you want to create.
-
Once chosen, new sections open based on selected request type. For all types except clocking incident and other reasons, select the day(s) when the request-related event begins.
-
When selecting Absences or Sick leaves, see an Upload File button to attach the absence or leave justification.
-
To choose the date, click the Start date calendar and click the request start day.
-
Then click the End date calendar and select the request end day. If selecting only one day, choose the same day in both selectors.
-
Finally, click Create Request.
Edit Requests
Managers can edit their employees' requests as long as they're not processed.
To edit a request:
- Open the app menu and under Management, click Requests.
- In the Request list section, click the request you want to edit and on the screen that appears, click the "Edit" button.
- Editable fields depend on request type; for example, in overtime requests, we can modify hours to compensate, hours to pay, and their multipliers.
- Once edited, click Save Changes.
View Request Information
- Open the app menu and under Management, click Requests.
- In the Request List section, choose the request you want to view by clicking Details. You can also use the search to find the employee.
- At the top left, find the request status (New, In progress, Waiting, Accepted, Rejected).
- Then find the request reason (Vacation, Absences, Sick leaves, Travel).
Request Change History
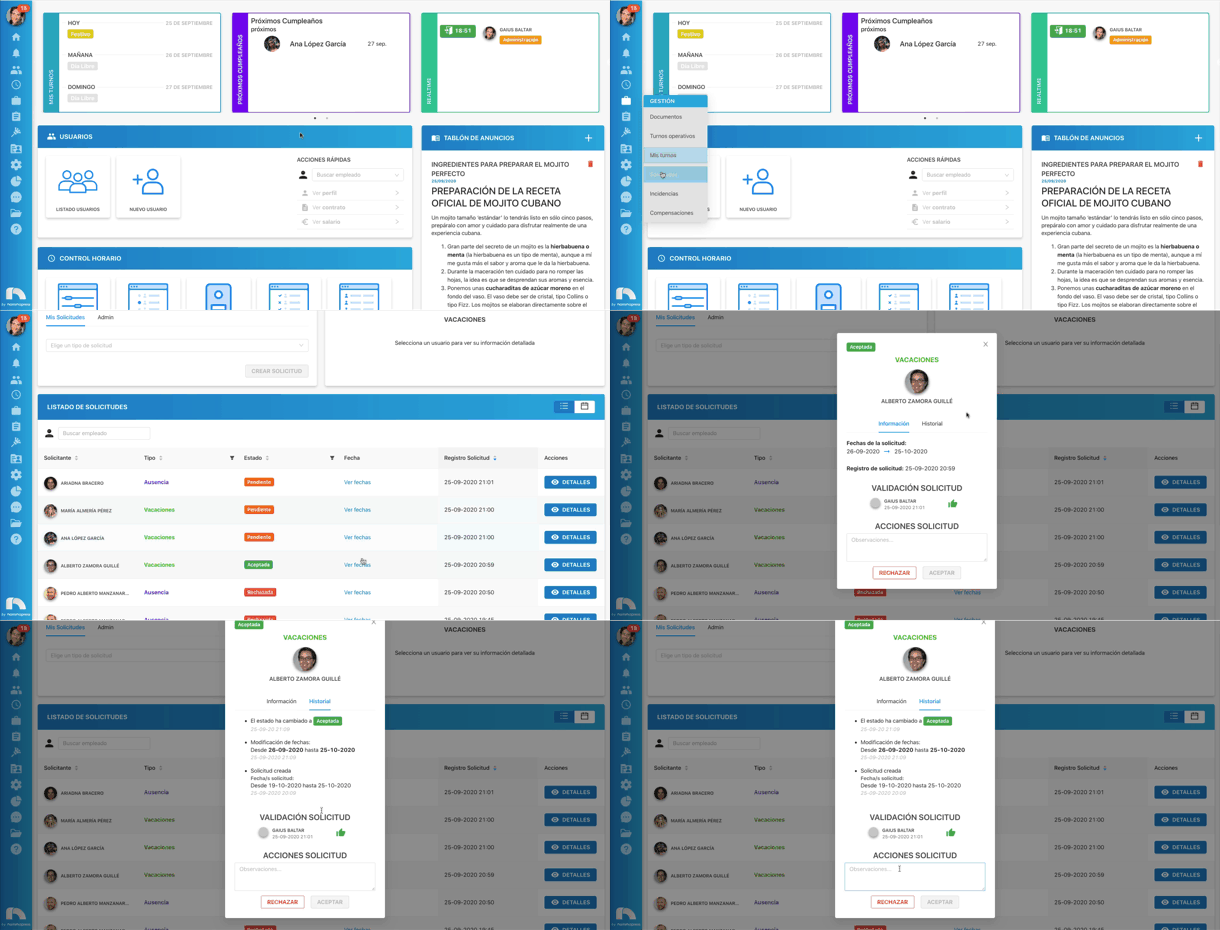
In request history, see a history with all request process states.
- Open the app menu and under Management, click Requests.
- Click Details to view request details.
- Then in the History tab, see a list with changes made to the request since creation.
Resolve Requests
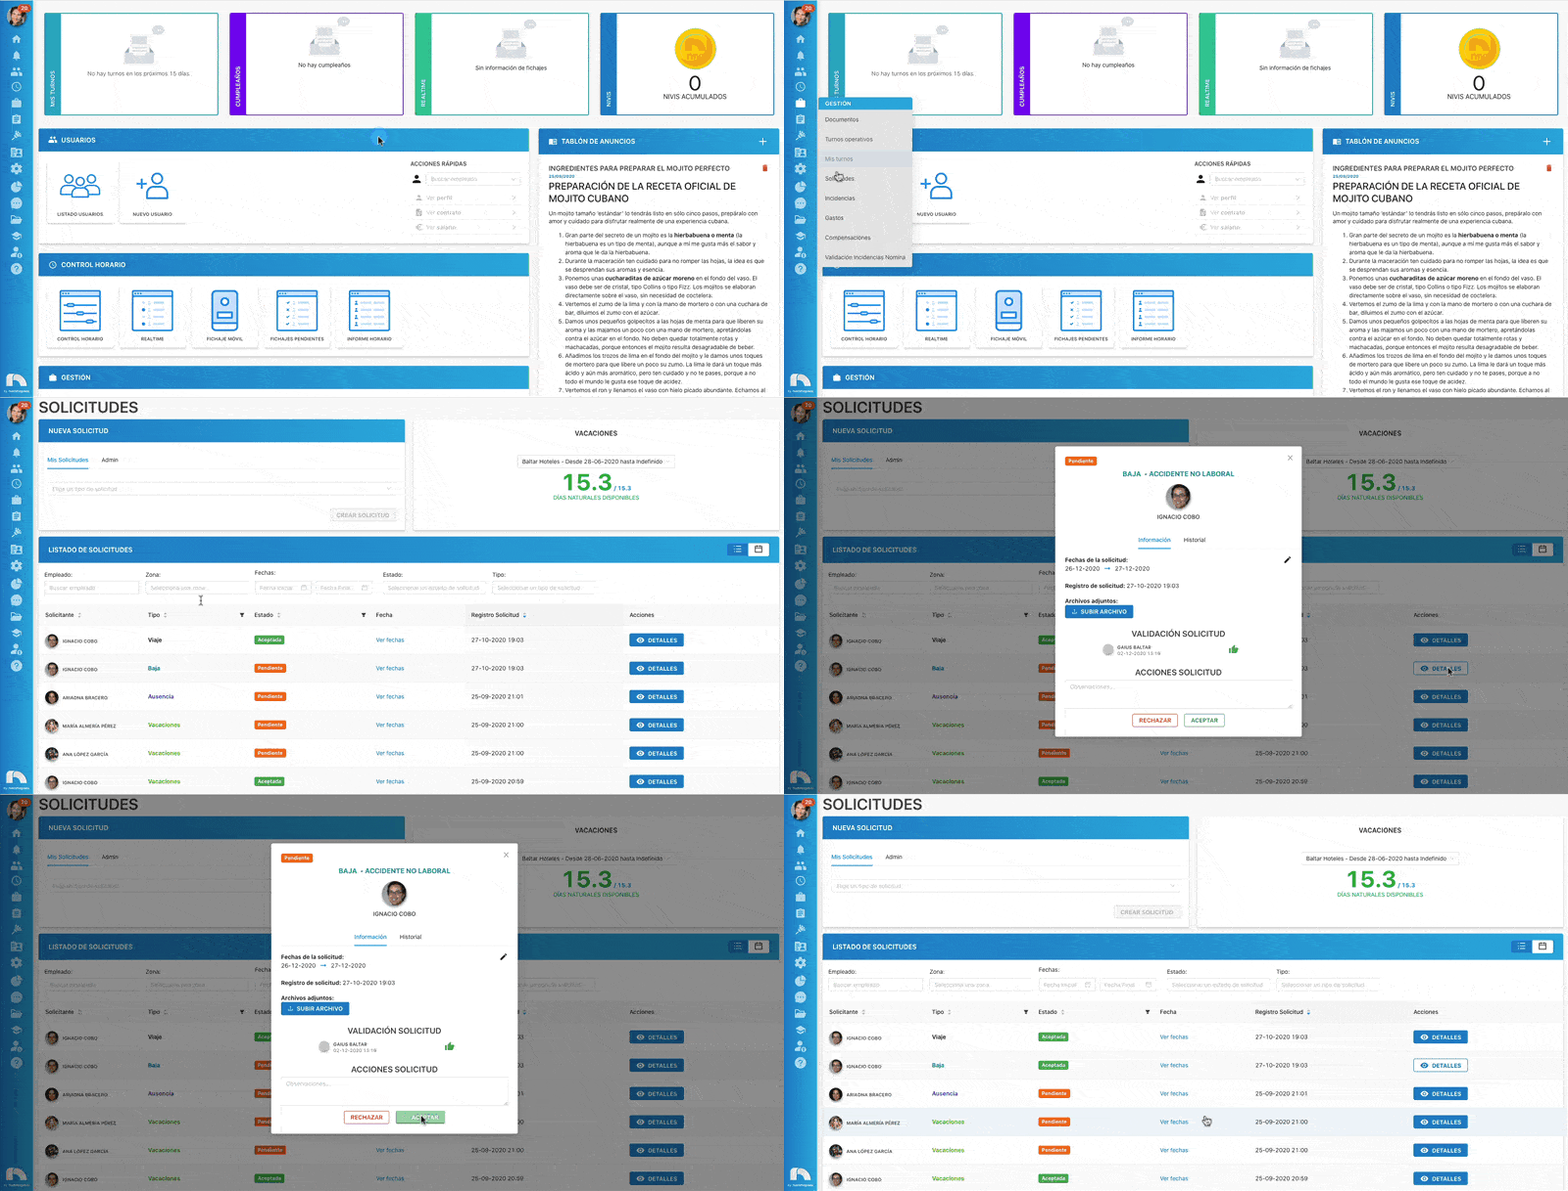
When employees send requests, center administrators must resolve them by either accepting or rejecting. To resolve a request:
- Open the app menu and under Management, click Requests.
- In the Request List section, see all sent requests.
- Find the Pending request and click the Details button.
- In the new window, see complete request information: employee name and photo, status, dates (if any), registration, and any observations.
- At the bottom, write any observations you want to add to the request.
- Finally, to accept, click the green Accept Request button. To reject, click the red Reject Request button.
A previously accepted request can be rejected, but a rejected request cannot change status to accepted.
Validate Requests
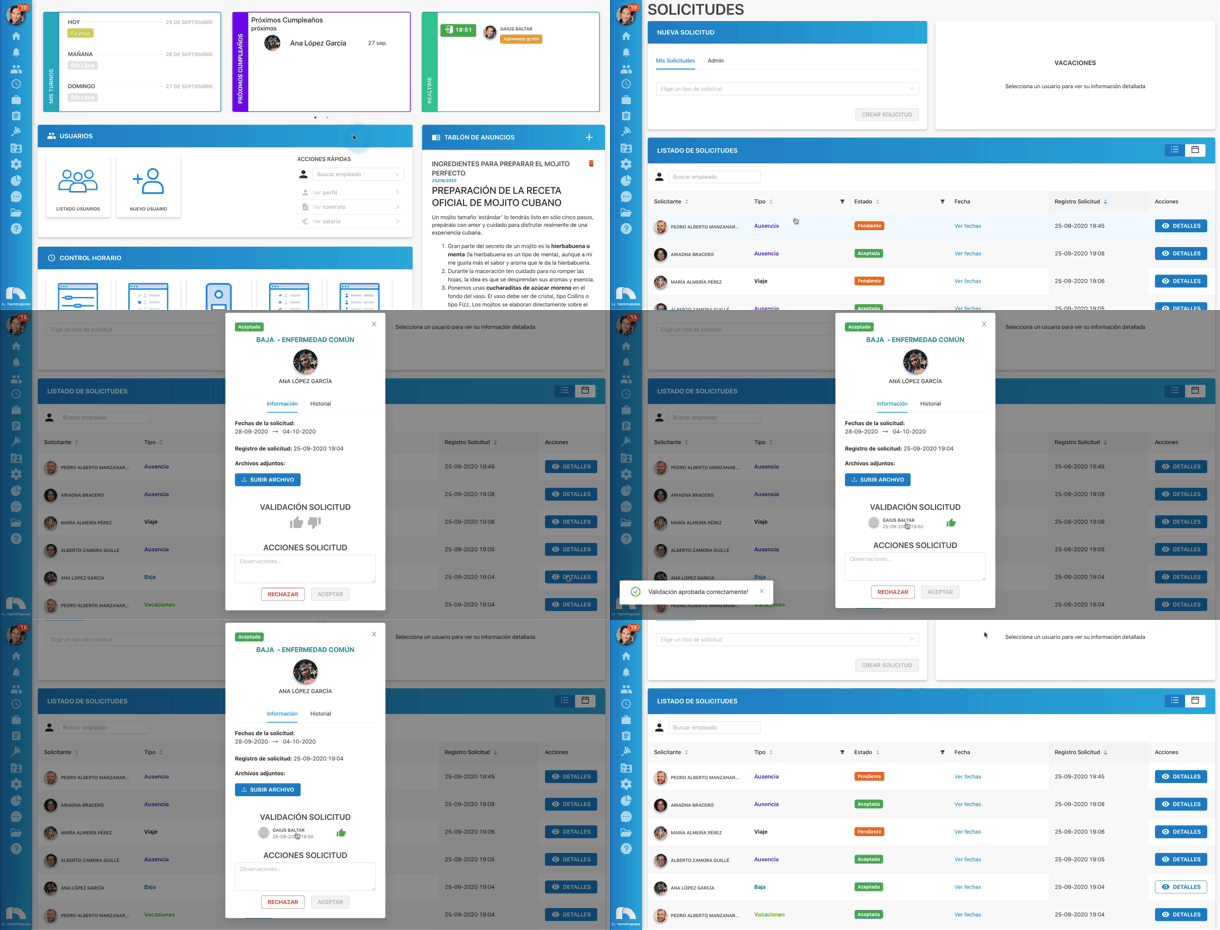
If the employee has multiple managers, the request reaches all of them, but they can only validate or reject it to provide information to the person resolving before they accept or reject. To validate or deny validation of a request:
- Open the app menu and under Management, click Requests.
- Click Details to view request details.
- Then in Information, scroll to REQUEST VALIDATION section.
- Thumbs up validates the request.
- Thumbs down denies request validation.
- Your validation is reflected in request information.
Validating or denying validation isn't the same as approving or rejecting. Validation only provides extra information to the person accepting or rejecting the request.
Overtime / Undertime and Absences
When an employee clocks in and out, a calculation is made of time spent at the center. If they don't reach contract hours or work extra hours, an Overtime or Undertime request is automatically generated.
Overtime: Once the request is accepted, it's processed in two ways:
- Pay bank: if we have a pay hours bank configured, this request goes directly to payroll incident validation once accepted.
- Compensate bank: if we have a compensate hours bank configured, once accepted, those hours are reflected in the hours bank to compensate time when appropriate. We can modify proposed overtime and if we have multiple multipliers configured, we can select one, plus choose which bank the request goes to (pay, compensate, or both).
Undertime: Generated if the employee clocks less time than the scheduled shift. If we have these requests activated, processing is as follows:
- If we reject the request, the employee has a shortage in the hours bank.
- If we accept the request, we gift that time to the employee. In Nivimu's basic configuration, undertimes automatically go to the hours bank; if we don't want to process these requests, activation isn't necessary.
Absences: Generated if the employee has a scheduled shift and doesn't clock in. If we reject the request, it's because the employee did attend work, so we'll be asked to create a clocking. If we accept the request, the employee will have an absence that automatically goes to the hours bank, subtracting a full shift.
Once this request is generated, "Proposed Overtime/Undertime" must be adjusted with Accepted Overtime. To do this:
- Open the app menu and under Management, click Requests.
- Select the "Overtime or Undertime" request.
- Click "Details".
- In Proposed overtime, see the extra hours generated.
- In Accepted overtime, adjust hours accepted by the company.
- Once adjusted, in Quick actions, accept the request.
Overtime and undertime can be activated at the administrator's preference, depending on whether the company allows overtime or not.
These requests are generated as long as the employee has a published shift and "allow overtime" marked in their employee file. Since it compares the employee's clocking with the published shift.